
7 Layering Tips for Beginners Who Struggle With Jackets
You put on a t-shirt, then a sweater, then a jacket on top — and somehow you look wider, shorter, and stiffer than when you started, not more put-together.
So you give up and just wear one heavy coat over whatever you had on underneath, hoping nobody notices the mismatch when you take it off indoors.
Layering trips up a lot of men, and it’s not because it’s actually complicated — it’s because nobody explains the logic behind it.
Most guys layer by simply adding pieces on top of each other until they’re warm enough, without thinking about how those pieces interact in terms of fit, bulk, and color. The result is an outfit that works temperature-wise but looks accidental.
This guide breaks down seven practical, beginner-friendly principles that fix that — how to layer in a way that actually looks intentional, works across different weather, and doesn’t leave you looking like you’re wearing three unrelated outfits stacked on top of each other.
Quick Reference: Layering Do’s and Don’ts
| Element | Don’t | Do |
|---|---|---|
| Fit progression | Same fit for every layer | Slightly looser with each layer outward |
| Bulk | Bulky base layer under a fitted jacket | Thin base layers, bulk saved for the outer layer |
| Color | Random, unrelated colors per layer | Tonal or complementary colors across layers |
| Number of layers | Too many thin layers with no purpose | 2–3 layers, each with a clear function |
| Jacket fit | Jacket sized for layering “just in case” | Jacket sized to fit over your actual layering setup |
| Visibility | Hiding every layer completely | Letting collars, cuffs, or hems peek through intentionally |
| Zippers/buttons | Fully closed on every layer, every time | Some layers open for shape and visual interest |
1. Layer From Thin to Thick, Not Randomly
What it means: Each layer, moving from your skin outward, should generally get slightly bulkier — a thin base layer (t-shirt or henley), a mid-layer with a bit more structure (shirt, light sweater), and an outer layer that has the most volume (jacket or coat).
Why beginners struggle here: It’s tempting to grab whatever’s clean or closest, which often results in a thick, bulky sweater worn under a slim jacket — the jacket ends up straining or looking oddly shaped because it wasn’t designed to fit over that much bulk.
Why it matters: This progression is what allows each layer to actually be visible and do its job. When a bulky mid-layer fights against a fitted outer layer, the whole silhouette looks lumpy and unintentional rather than deliberately layered.
How to apply it:
- Base layer: t-shirt, henley, or thin long-sleeve — close to the body, minimal bulk.
- Mid-layer: button-up shirt, light sweater, or overshirt — slightly more structure, still manageable bulk.
- Outer layer: jacket or coat — the layer with the most room, sized to comfortably fit over what’s underneath.
Common Mistake: Wearing a chunky wool sweater as a mid-layer under a slim-fit jacket, which either won’t close properly or will visibly strain across the chest and shoulders.
Fit Tip: When shopping for an outer layer you plan to wear over mid-layers regularly, try it on with a sweater underneath, not just a t-shirt — a jacket that fits perfectly over a bare torso may not fit at all over your actual cold-weather setup.
Key takeaway: Save your bulkiest piece for the outermost layer — everything underneath should get progressively thinner, not the other way around.
2. Keep Colors Connected Across Layers
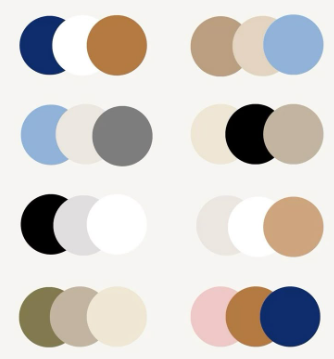
What it means: The colors of your base, mid, and outer layers should relate to each other — either through matching tones (all neutrals), a controlled color palette (two to three coordinated colors), or intentional, complementary contrast.
Why beginners struggle here: Each layer often gets chosen separately and thrown on without checking how the colors interact once they’re all visible together — especially at the collar, cuffs, and hem, where multiple layers show at once.
Why it matters: Layering naturally creates more visual “surface area” than a single-layer outfit, since more colors and textures are visible simultaneously. Without coordination, this quickly turns into visual clutter instead of a cohesive look.
How to apply it:
- Stick to a neutral base (white, gray, black, navy, olive, tan) for at least two of your three layers.
- Use one layer — usually the mid-layer or an accessory — as your single accent color.
- Avoid combining more than two to three distinct colors across all visible layers.
Stylist Tip: When in doubt, build layers in the same color family but different shades — a light gray tee, a mid-gray overshirt, and a charcoal jacket, for example. This creates depth without any risk of clashing.
Common Mistake: Wearing a bright red base layer, a green mid-layer, and a blue outer layer — each color might be fine individually, but combined, they compete for attention instead of working together.
Key takeaway: Treat your layers as one connected outfit, not three separate outfit choices stacked on top of each other.
3. Let Layers Peek Through on Purpose
What it means: Instead of hiding every under-layer completely, let small, deliberate amounts show — a shirt collar over a sweater, a cuff peeking out from a jacket sleeve, or a hem of a base layer visible beneath a shorter mid-layer.
Why beginners struggle here: The instinct is often to keep everything tucked away and hidden, either out of uncertainty about how to show it correctly or simply not realizing that visible layering details are part of what makes an outfit read as intentional rather than accidental.
Why it matters: These small visible details are what separate “wearing multiple layers because it’s cold” from “layering as a styling choice.” They add texture and depth without requiring any additional pieces.
How to apply it:
- Wear a collared shirt under a crewneck sweater, and let the collar sit visibly over the sweater’s neckline.
- Roll jacket sleeves slightly, or choose a jacket with slightly shorter sleeves, to reveal a bit of shirt cuff underneath.
- If your base layer is a slightly different length than your mid-layer, let a small amount show at the hem rather than always fully tucking everything away.
Common Mistake: Wearing a mid-layer with a high, closed neckline over a shirt with a collar, which crushes the collar awkwardly instead of letting it sit naturally on top.
Confidence Tip: These details are subtle, but they’re often exactly what people notice — even if they couldn’t tell you specifically what looked intentional about your outfit.
Key takeaway: A little visible detail from an under-layer signals that the layering was planned, not just piled on for warmth.
4. Make Sure Your Outer Layer Actually Fits Over Everything
What it means: Your jacket or coat needs to be sized and cut to comfortably accommodate your typical layering setup — not just fit well over a bare t-shirt in a fitting room.
Why beginners struggle here: Jackets are frequently tried on and purchased in isolation, often over just a t-shirt, without testing how they’ll actually perform once a sweater or shirt is layered underneath during colder months.
Why it matters: A jacket that fits perfectly over one thin layer but strains, pulls, or won’t fully close over your real cold-weather layering setup isn’t actually the right size — it just tested well under artificial conditions.
How to apply it:
- When shopping for an outer layer meant for colder weather, try it on with a sweater or mid-layer underneath, not just a t-shirt.
- Pay attention to the shoulders and chest specifically — these are the areas most likely to strain if there isn’t enough room for layering.
- If a jacket only works with minimal layers underneath, save it for milder weather and choose a different piece for your heaviest layering days.
Common Mistake: Buying a slim-fit jacket that looks great in the store over a t-shirt, then finding it unusable the first genuinely cold day when a sweater is added underneath.
Shopping Tip: If you’re shopping online, check the jacket’s specific fit notes (slim, regular, relaxed) and consider sizing up slightly for pieces you specifically intend to layer heavily under, rather than assuming your usual size will automatically work.
Key takeaway: Test your outer layer with your actual layering setup in mind — not just how it fits in isolation.
5. Balance Proportions Between Layers
What it means: If one layer is looser or longer, the others should generally be more fitted or shorter, so the overall silhouette stays balanced rather than shapeless.
Why beginners struggle here: It’s easy to default to relaxed fits across every single layer for comfort, without realizing that stacking multiple loose, long pieces on top of each other removes any sense of shape from the outfit entirely.
Why it matters: Proportion balance is one of the core principles behind why some layered outfits look intentional and others look like someone just kept adding clothes until they were warm enough.
How to apply it:
- If your mid-layer (sweater or overshirt) is relaxed or slightly oversized, pair it with more fitted or straight-leg trousers, not baggy ones.
- If your outer layer is long (like a longer coat), keep the layers underneath from adding additional length or bulk.
- Aim for at least one fitted element in any layered outfit — usually the base layer or the trousers — to anchor the silhouette.
Body Type Note: Slimmer men often benefit from slightly more relaxed mid-layers to add visual weight, while broader or athletic men usually look more balanced, keeping mid-layers closer to the body and letting the outer layer provide the room.
Common Mistake: Combining an oversized hoodie, a baggy jacket, and wide-leg trousers — each piece might look fine individually, but together the outfit loses all sense of shape.
Key takeaway: At least one layer in your outfit should stay fitted to keep the overall silhouette from disappearing into shapelessness.
6. Don’t Over-Layer — Three Pieces Is Usually the Limit
What it means: Beyond a base layer, a mid-layer, and an outer layer, additional pieces usually start adding bulk and visual clutter rather than genuine warmth or style value.
Why beginners struggle here: Cold weather can trigger an instinct to keep adding pieces — a t-shirt, a long-sleeve, a sweater, a vest, and a coat all at once — without recognizing that most of this bulk is redundant and makes the outfit harder to move in and less visually clean.
Why it matters: Three well-chosen layers, each with a genuine function (base, insulation, protection), almost always look — and perform — better than five layers stacked without a clear purpose for each one.
How to apply it:
- Ask what job each layer is doing. If two layers are serving the exact same purpose (like two mid-weight sweaters), you likely only need one.
- For genuinely cold conditions, prioritize one warmer, higher-quality mid-layer over two thinner mismatched ones.
- Save extra layers (scarves, vests) for when the weather specifically calls for them, not as a default habit.
Common Mistake: Wearing a long-sleeve shirt, a sweater, and a hoodie all underneath a jacket “just in case,” resulting in an outfit that’s both visually bulky and physically difficult to move in.
Maintenance Tip: Over-layering also means more fabric bunching and rubbing against itself, which can cause pilling and wear faster than a cleaner, more deliberate layering setup.
Key takeaway: More layers isn’t automatically warmer or more stylish — each one should have a specific, non-redundant job.
Read also: How to Build a Casual Wardrobe from Scratch (The Lazy Man’s Guide)
7. Practice Layering Indoors Before You Need It Outside
What it means: Before a genuinely cold day, or before an important event where you’ll be layering, try the full combination on at home — check the fit, the proportions, and how it looks buttoned, unbuttoned, and in motion.
Why beginners struggle here: Layering is often figured out in real time, on the way out the door on a cold morning, which leaves no room to notice fit problems, color clashes, or bulk issues until you’re already out and stuck with the result.
Why it matters: A layering combination that looks fine in your head rarely translates perfectly on the first try — small adjustments (leaving a layer open, swapping a color, sizing an outer layer differently) are much easier to catch with time to actually look and test, rather than rushing.
How to apply it:
- The first time you try a new layering combination, do it a day or two before you actually need it, not the morning of.
- Check the outfit sitting down, walking, and reaching forward — not just standing still in front of a mirror.
- Take a quick photo if possible; it often reveals fit and color issues that a mirror alone misses.
Common Mistake: Discovering a jacket doesn’t actually close over a sweater, or that two layers clash badly in color, only after you’re already dressed and short on time.
Budget Tip: This habit costs nothing and prevents both wasted time and the temptation to buy a rushed, unnecessary new piece simply because an existing layering combination didn’t work as expected.
Key takeaway: A few minutes of testing at home saves you from discovering fit or color problems in public, when it’s too late to easily fix them.
Putting It Together: A Simple 3-Layer Formula
If you take nothing else from this guide, use this as your default cold-weather layering formula:
- Base layer: A well-fitted t-shirt, Henley, or thin long-sleeve shirt in a neutral tone.
- Mid-layer: A button-up shirt, light sweater, or overshirt — slightly more relaxed than the base, still not bulky.
- Outer layer: A jacket or coat sized to comfortably fit over the first two layers, in a coordinating or neutral color.
Keep one layer fitted (usually the base or the trousers), let a small detail from an under-layer show intentionally (a collar, a cuff), and stop at three layers unless the weather specifically demands more.
Seasonal Layering Adjustments
Transitional weather (spring/fall): A base layer and one mid-layer (overshirt or light jacket) is often enough — save the heavier outer layer for genuinely cold days, and prioritize pieces you can easily remove and carry if the temperature shifts.
Cold weather: Follow the full 3-layer formula, prioritizing a slightly warmer mid-layer (wool or heavier cotton knit) over adding a fourth piece.
Indoor-to-outdoor transitions: Choose layers that still look coordinated once the outer layer comes off — this is exactly why color coordination and fit balance between the base and mid-layer matter, since you’ll likely be seen in just those two for a portion of the day.
Seasonal Tip: Keep a lightweight, easily removable mid-layer (like a thin overshirt) on hand during transitional months — it’s far easier to take off and carry than to be stuck without enough warmth.
Common Layering Mistakes Recap
| Mistake | Why It Happens | Quick Fix |
|---|---|---|
| Bulky mid-layer under fitted jacket | Grabbing whatever’s available | Save bulk for the outer layer |
| Random, clashing colors per layer | Choosing each layer separately | Stick to 2–3 coordinated colors |
| Everything fully hidden and tucked | Uncertainty about visible layering | Let a collar or cuff show intentionally |
| Jacket doesn’t fit over real layers | Trying jackets on with only a t-shirt | Test with your actual mid-layer |
| All layers loose and shapeless | Prioritizing comfort in every layer | Keep at least one fitted layer |
| Too many redundant layers | “Just in case” over-layering | Limit to 3 layers, each with a purpose |
| Discovering issues last-minute | Layering figured out the morning of | Test the combination ahead of time |
Frequently Asked Questions
1. How many layers should I wear in cold weather? Three is generally the sweet spot — a base layer, a mid-layer, and an outer layer — each with a distinct purpose. More than that usually adds bulk without meaningfully more warmth or style value.
2. What’s the biggest layering mistake beginners make? Wearing a bulky mid-layer, like a thick sweater, underneath a slim-fit jacket that wasn’t designed to accommodate it, causing strain and an awkward silhouette.
3. Should all my layers be the same color? Not necessarily the same color, but coordinated — staying within two to three complementary or tonal colors keeps a layered outfit looking intentional rather than cluttered.
4. Can I layer with just two pieces instead of three? Yes, especially in milder weather — a base layer and a mid-layer, like a t-shirt and an overshirt, is a complete and effective layering combination on its own.
5. How do I know if my jacket is too small for layering? If it strains, pulls, or won’t fully close once you add your usual mid-layer underneath, it’s not properly sized for your real layering needs, even if it fit well over a t-shirt alone.
6. Is it okay to leave layers unbuttoned or open? Yes — leaving a mid-layer or outer layer open is often what creates visual interest and shows off the layers underneath intentionally, rather than closing everything and hiding the layering entirely.
7. What’s an easy first layering combination for a beginner to try? A plain t-shirt, an open overshirt in a coordinating neutral color, and jeans — it’s simple, low-risk, and introduces the core principles of layering without requiring specialized pieces.
8. Do layering rules change based on body type? The core principles stay the same, but slimmer men may lean toward slightly more relaxed mid-layers for added shape, while broader men often look best keeping mid-layers closer to the body and letting the outer layer provide room.
9. How do I layer for indoor and outdoor settings in the same day? Make sure your base and mid-layer look coordinated and complete on their own, since you’ll likely be seen without the outer layer for parts of the day, particularly indoors.
10. Can layering work for warm weather too? Yes, in a lighter form — a short-sleeve button-up over a t-shirt, or a light overshirt, adds texture and depth without significant added warmth, following the same fit and color principles as cold-weather layering.
Final Thoughts
Layering isn’t about piling on more clothes until you’re warm enough — it’s about choosing pieces that work together in fit, bulk, and color, with each one doing a specific job. Once you start thinking in terms of thin-to-thick progression, coordinated colors, and intentionally visible details, layering stops feeling like guesswork and starts feeling like a system you can rely on.
Start with the simple three-layer formula above, test it at home before you actually need it, and adjust one variable at a time — color, fit, or bulk — until it clicks. From there, the same logic applies no matter how many jackets, sweaters, or coats you eventually add to your wardrobe.
Read also: